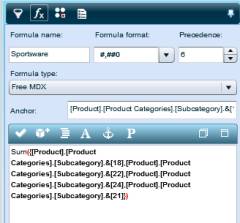
To switch to Free MDX mode,
click the Edit as Free MDX ![]() button on the Formula Pane, or open the
dropdown list in Formula Type and choose Free MDX and click
OK. The Formula Pane is now ready for working in Free MDX
mode.
button on the Formula Pane, or open the
dropdown list in Formula Type and choose Free MDX and click
OK. The Formula Pane is now ready for working in Free MDX
mode.
When you switch to Free MDX mode for a formula that is currently displaying in the Formula Pane, the MDX box shows the MDX statement for the defined calculation.
Perform the following steps:
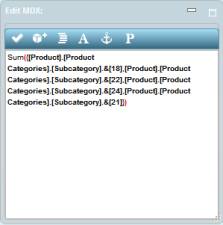
1. In the MDX box, type in the MDX statement.
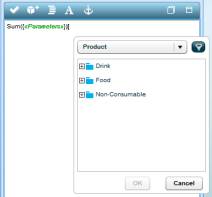
When you type a [ (square bracket ), Necto automatically opens the dimension hierarchies tree for selecting members. You can perform multiple selections from the tree.
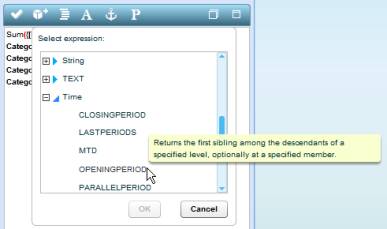
To insert an OLAP function, click ![]() . The functions are organized in groups. Tooltips
provide descriptions for the available functions.
. The functions are organized in groups. Tooltips
provide descriptions for the available functions.
Choose a function and click OK.
To insert a placeholder, click
![]() .
.
2. To add items to the formula, drag and drop members from the grid to the MDX box.
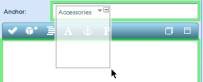
3. Anchor is a grid member that indicates the location of the formula in the grid. The formula you are creating will be placed in the grid next to the member you specify in the Anchor field.
Drag and drop the anchor
from the grid to the Anchor field. Note that you can drop
the anchor only when the ![]() icon disappears.
icon disappears.
4. Enter a Formula Name, and change the Formula Format and Precedence if needed. For details, see Creating a Formula.
5.
When you finish defining the formula, click
![]() to
verify the formula syntax.
to
verify the formula syntax.
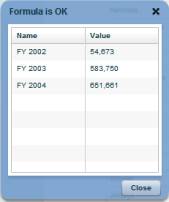
If the formula is valid, a window opens showing a preview of the new member’s cell values. Click Close.
If the formula is not valid, a message appears notifying that the “formula check failed”. Click OK and correct the error in the MDX statement. Repeat this step until you get a valid syntax.
6. Click Apply.
You can also add to the MDX
statement parameters defined via the navigation component. These
parameters are available for embedding via the Placeholders dialog
box. To open the Placeholders dialog box click
![]() .
.
If you want to define a new
parameter for the MDX formula, you can open the Parameters Designer
dialog box by clicking ![]() . This
dialog box is the same as the Navigation Designer dialog
box. After defining the parameter, you can add it to the MDX
statement manually using the syntax [[Parameter
Name]] or by selecting it from the
Parameter Placeholders tab of
the Placeholders dialog box.
. This
dialog box is the same as the Navigation Designer dialog
box. After defining the parameter, you can add it to the MDX
statement manually using the syntax [[Parameter
Name]] or by selecting it from the
Parameter Placeholders tab of
the Placeholders dialog box.
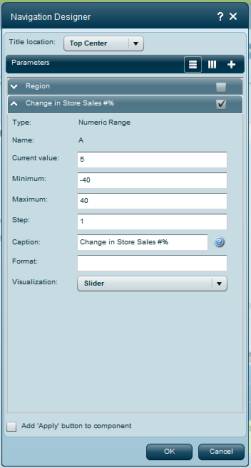
Define an MDX formula to calculate the expected store sales as a result of a change in sales. Define the change percentage as a parameter and insert it in the MDX statement. Users can use the navigation control to choose a possible change percentage in sales and view the results in the Expected Store Sales formula member in the grid.
Definition of parameter A in navigation component:
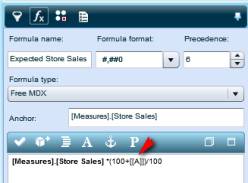
Definition of MDX formula containing parameter A:
User can use the slider in the navigation component to set a value for “Change in Store Sales #%”. The Expected Store Sales formula member in the grid will display the changes according to the selected value.

The Free MDX mode includes simple formatting options that enable you to change the look of the MDX statement and make it more readable.
The Format MDX option arranges an MDX statement and performs syntax highlighting.
To format the MDX statement:
Click the ![]() button.
button.
To change the font:
Click the ![]() button. In the font selection window,
choose the desired font and font size.
button. In the font selection window,
choose the desired font and font size.
You can maximize and minimize the MDX Formula Pane and even transform it to a floating window.
To maximize the MDX Formula Pane:
Click ![]() in the pane. The pane now fits the
full size of your screen.
in the pane. The pane now fits the
full size of your screen.

To minimize the MDX Formula Pane:
Click ![]() . This restores the pane to its original size and
position.
. This restores the pane to its original size and
position.
To transform the MDX Formula Pane into a floating window:
Click ![]() . The pane becomes a floating
window.
. The pane becomes a floating
window.
To move the floating window, click the window’s title and drag it to the position you want.
To dock the MDX Formula Pane
in its initial position, click ![]() .
.